Spring Boot 2.6.0についてメモ
はじめに
もうしばらく前ですがSpring Bootが11月9日に出てますね。
ちょっと仕事がバタバタしててモチベーションが出ず更新ができていなかったのですがまたゆっくりでも再開していきたいと思います。
このブログではすべての変更点を網羅するわけでは無く、個人的に気になったところをまとめてみたり使ってみたりしようと思います。
2.6.0のすべての変更に付いてはRelease Noteを確認してください。
ちなみに話題になっているLog4J2やLogbackなどの脆弱性の対応は12月23日に出る2.6.2(2.5系なら2.5.8)でライブラリのアップデートが入るみたいですね。
動かして確認してみる
環境
$ lsb_release -a
LSB Version:    core-11.1.0ubuntu2-noarch:security-11.1.0ubuntu2-noarch
Distributor ID: Ubuntu
Description:    Ubuntu 20.04.3 LTS
Release:    20.04
Codename:   focal


$ uname -srvmpio
Linux 5.4.0-91-generic #102-Ubuntu SMP Fri Nov 5 16:31:28 UTC 2021 x86_64 x86_64 x86_64 GNU/Linux

$ ./mvnw -v
Apache Maven 3.8.3 (ff8e977a158738155dc465c6a97ffaf31982d739)
Maven home: /home/yuya-hirooka/.m2/wrapper/dists/apache-maven-3.8.3-bin/5a6n1u8or3307vo2u2jgmkhm0t/apache-maven-3.8.3
Java version: 17, vendor: Oracle Corporation, runtime: /home/yuya-hirooka/.sdkman/candidates/java/17-open
Default locale: ja_JP, platform encoding: UTF-8
OS name: "linux", version: "5.4.0-91-generic", arch: "amd64", family: "unix"


$ java  --version
openjdk 17 2021-09-14
OpenJDK Runtime Environment (build 17+35-2724)
OpenJDK 64-Bit Server VM (build 17+35-2724, mixed mode, sharing)
今回動作確認を行うアプリケーションはSpringを使って設定は以下のようにして作ります。
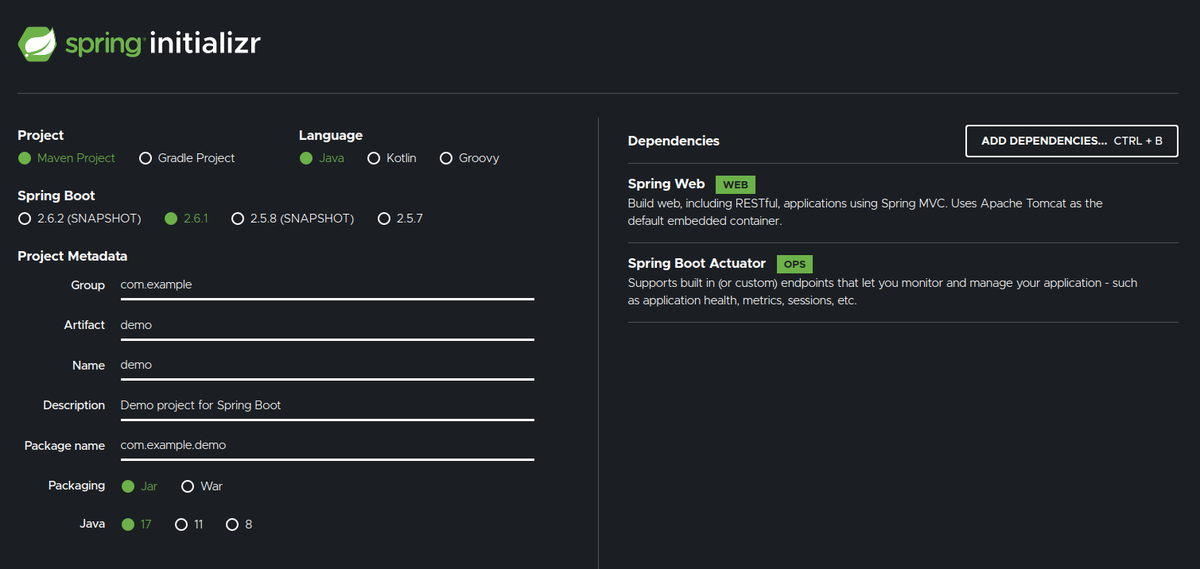
Bootのバージョンはこのブログを書いている段階での最新である2.6.1をを使おうと思います。
動作確認の関係でWebとActuatorの依存だけ入れてます。
大まかな変更点
2.6.0では大きく以下のような変更が行われいます。
- サーブレットアプリでのSameSite Cookie Attributeのサポート
- Actuator周りの変更
- WebTestClientを用いたMVCアプリケーションのテストサポート
- Recordクラスで@ConfigurationPropertiesを使う際に@ConstructorBindingをつける必要がなくなった
- Docker Imageビルド周りのサポートの追加
EOL
Spring Boot のEOLはこちらの公式のサイトにまとめられています。
それに寄ると2.6.x系のサポートは2023年5月18日に完全にサポートが終わるようですね。
まとめていく
サーブレットアプリでのSameSite Cookie Attributeのサポート
Servletのアプリケーションに置いて、SameSiteの設定をserver.servlet.session.cookie.same-siteプロパティを通して設定することが可能になったようです。
これはTomcat、Jetty、Undertowなどのサーバーで利用可能です。
Actuator周りの変更
メインポートや管理ポートに追加のパスを指定することができるようになった
ActuatorのHealth Groupの機能を使えば複数のヘルスインディケーターをグルーピングして公開したりすることができます。別のポートヘルスチェックのエンドポイントを公開するとその信頼性が下がってしまう場合があります。そのような場合に置いて追加パスを指定して管理用のポートではなくサーバのポートでヘルスチェックのエンドポイントを公開することができるようになりました。
例えば以下のような設定でグループを作ります。
application.properties
management.server.port=9090
management.endpoint.health.group.moheji.include=ping
ここでmehejiの部分は任意の文字列でつけるグループ名になります。
このヘルスグループにアクセスする際には以下のようにリクエストを送ります。
$ curl http://localhost:9090/actuator/health/moheji
{"status":"UP"}
これに対して/actuator/health/mohejiなどのPathでは無く追加のアクセス用のPathを作ることができます。
メインポートと管理用ポートのどちらかで公開することができます。
例えば下記のような設定を記述するとmainのポートの/henohenoのパスで mohejiグループのヘルスチェックのエンドポイントが公開できるようです。
management.endpoint.health.group.moheji.additional-path="server:/henoheno"
メインのポートでは無く管理用のポートを使いたい場合は server:の代わりにmanagement:を使うようにします。
infoのエンドポイントでJavaの実行環境の情報を取得できるようになった
management.info.java.enabled=trueと設定することでJavaの実行環境の情報を/actuator/infoから取得できるようになります。
以下のように設定を追加します。
management.endpoints.web.exposure.include=info
management.info.java.enabled=true
$ curl localhost:9090/actuator/info  | jq
  % Total    % Received % Xferd  Average Speed   Time    Time     Time  Current
                                 Dload  Upload   Total   Spent    Left  Speed
100   222    0   222    0     0  44400      0 --:--:-- --:--:-- --:--:-- 44400
{
  "java": {
    "vendor": "Oracle Corporation",
    "version": "17",
    "runtime": {
      "name": "OpenJDK Runtime Environment",
      "version": "17+35-2724"
    },
    "jvm": {
      "name": "OpenJDK 64-Bit Server VM",
      "vendor": "Oracle Corporation",
      "version": "17+35-2724"
    }
  }
}
WebTestClientを用いたMVCアプリケーションのテストサポート
SpringMVCをモック環境で利用することが可能になりました。
今までは、Mock環境のWebFluexか実際に立ち上がっているサーバに対するサポートしか行われていませんでしたが、今回のアップデートで
@AutoConfigureMockMvcを付けたクラスはWebTestClientをDIで受け取ることができる用になり、テストを実行できます。
注意点としてはWebTestClientを使うためにはWebfluxが依存として追加されている必要があるので今回は以下の用に依存をPomに追加しておきます。
<dependency>
    <groupId>org.springframework.boot</groupId>
    <artifactId>spring-boot-starter-webflux</artifactId>
</dependency>
依存の追加ができたら実際にテストを記述していきます。
例えば、以下のようなコントローラをテストしたい場合。
@RestController
public class HelloController {

    @GetMapping("/hello")
    public String hello() {
        return "hello";
    }
}
次のようにテストを記述することができます。
@SpringBootTest
@AutoConfigureMockMvc
class HelloControllerTest {

    @Autowired
    WebTestClient client;

    @Test
    public void testHelloController() {
        client.get()
                .uri("/hello")
                .exchange()
                .expectStatus().isOk()
                .expectBody(String.class).isEqualTo("hello");
    }
}
Recordクラスで@ConfigurationPropertiesを使う際に@ConstructorBindingをつける必要がなくなった
Recordsで@ConfigurationPropertiesを使う場合もしコンストラクターが1つである場合は@ConstructorBindingをつける必要がなくなりました。
例えば今までだとRecordクラスで@ConfigurationPropertiesを使う場合は以下のように記述する必要がありました。
@ConfigurationProperties("greeting")
@ConstructorBinding
public record MyProperties(String word) { }
これが2.6からはコンストラクターが1つしかない場合は以下のように@ConstructorBindingを省略することができます。
@ConfigurationProperties("greeting")
public record MyProperties(String word) {}
先程のWebTestClientでテストしたControllerをプロパティーを読み込んだ文字列を返すように変更してみます。
MyProperties.java
@ConfigurationProperties("greeting")
public record MyProperties(String word) {}
Config.java
@Configuration(proxyBeanMethods = false)
@EnableConfigurationProperties(MyProperties.class)
public class Config {
}
HelloController.java
@RestController
public class HelloController {
    final private MyProperties properties;

    public HelloController(MyProperties properties) {
        this.properties = properties;
    }

    @GetMapping("/hello")
    public String hello() {
        return properties.word();
    }
}
application.propertiesにプロパティーを追加します。
greeting.word=Hello
アプリを起動してcURLでアクセスします。
$ curl localhost:8080/hello
Hello
Docker Imageビルド周りのサポートの追加
追加のイメージタグ
Docker Imageビルドの際にMavenやGradleに設定を記述すれば追加のタグを指定できるようになり、同じイメージを複数の名前でビルドできるようになりました。
例えばMavenの場合以下のようにPomに設定を記述することで複数のイメージをビルドすることができます。
<build>
    <plugins>
        <plugin>
            <groupId>org.springframework.boot</groupId>
            <artifactId>spring-boot-maven-plugin</artifactId>
            <configuration>
                <image>
                    <name>greeting-app</name>
                    <tags>
                        <tag>hoge</tag>
                        <tag>fuga</tag>
                    </tags>
                </image>
            </configuration>
        </plugin>
    </plugins>
</build>
そして、./mvnw spring-boot:build-imageを実行すると以下のように3つのイメージをビルドしてくれます。
$ ./mvnw spring-boot:build-image
(省略)
[INFO] Successfully built image 'docker.io/library/greeting-app:latest'
[INFO]
[INFO] Successfully created image tag 'docker.io/library/hoge'
[INFO]
[INFO] Successfully created image tag 'docker.io/library/fuga'
(省略)
キャッシュの設定
The CNB builder caches layers that are used when building and launching an image. By default, these caches are stored as named volumes in the Docker daemon with names that are derived from the full name of the target image. If the image name changes frequently, for example when the project version is used as a tag in the image name, then the caches can be invalidated frequently.
Cloud Native Buildpacksはイメージをビルドするサイト起動する際にそれぞれキャッシュを行いますが、デフォルトではフルのイメージ名を利用してそのキャシュを管理します。例えばイメージの名前がよく変わるなどする場合は(tagでバージョニングを行っている際など)このキャッシュが同様の頻度で利用できなくなってしまいまいます。
そういった問題を解決するためキャッシュの変わりの名前を設定できるようになりました。
この機能を利用するためには次のような設定をPomに記述します。
<project>
    <build>
        <plugins>
            <plugin>
                <groupId>org.springframework.boot</groupId>
                <artifactId>spring-boot-maven-plugin</artifactId>
                <configuration>
                    <image>
                        <buildCache>
                            <volume>
                                <name>cache-${project.artifactId}.build</name>
                            </volume>
                        </buildCache>
                        <launchCache>
                            <volume>
                                <name>cache-${project.artifactId}.launch</name>
                            </volume>
                        </launchCache>
                    </image>
                </configuration>
            </plugin>
        </plugins>
    </build>
</project>