Spring REST DocsとSpring Cloud Contractを連携して使ってみる
はじめに
Spring REST DocsはSpringのRestFullアプリケーションにおけるWebAPIのインターフェースをドキュメント化する際のサポートをしてくれます。Spring MVC Testをもとにスニペットを自動生成し、Asciidoctorの形式で出力してくれます。
また、Spring Cloud ContractはConsumer Driven Contractのサポートを提供しているプロジェクトです。Spring Cloud Contractに関しては以前にブログを書いたので良ければこちらをご覧ください。
この2つは組み合わせて利用することが可能なようなので、試してみたいと思います。
組み合わせることでなにが変わるのか?
端的に言うと、Spring Cloud Contractで書いていた契約のYamlファイルを書く必要がなくなるみたいです。その分テストを自分で書くことになるのでその面だけで考えると一長一短みたいなところはあるかもしれないです。ただ、全体として考えると、テストを記述することでCDCのサポートを受けれるようになり、かつAPIがヒューマンリーダブルな形でドキュメント化されるようになります。
やってみる
実行環境
実行環境は以下の通り
$ java --version
openjdk 15.0.1 2020-10-20
OpenJDK Runtime Environment (build 15.0.1+9-18)
OpenJDK 64-Bit Server VM (build 15.0.1+9-18, mixed mode, sharing)


$ mvn --version
Apache Maven 3.6.3
Maven home: /usr/share/maven
Java version: 15.0.1, vendor: Oracle Corporation, runtime: /home/someone/.sdkman/candidates/java/15.0.1-open
Default locale: ja_JP, platform encoding: UTF-8
OS name: "linux", version: "5.4.0-52-generic", arch: "amd64", family: "unix"
プロジェクトはSpring Iniializrを使って、以下の設定で作成します

また、CDCのConsumer側はSpring Cloud Contractの使い方と変わらないため、Spring Cloud ContractのProducer側のみを作成します。
pomを軽く眺めてみる
作成されたプロジェクトのpomを軽く眺めてみると必要な依存が入っているのといくつかのプラグインが設定されています。
<plugins>
    <plugin>
        <groupId>org.springframework.cloud</groupId>
        <artifactId>spring-cloud-contract-maven-plugin</artifactId>
        <version>2.2.4.RELEASE</version>
        <extensions>true</extensions>
        <configuration>
            <testFramework>JUNIT5</testFramework>
        </configuration>
    </plugin>
    <plugin>
        <groupId>org.asciidoctor</groupId>
        <artifactId>asciidoctor-maven-plugin</artifactId>
        <version>1.5.8</version>
        <executions>
            <execution>
                <id>generate-docs</id>
                <phase>prepare-package</phase>
                <goals>
                    <goal>process-asciidoc</goal>
                </goals>
                <configuration>
                    <backend>html</backend>
                    <doctype>book</doctype>
                </configuration>
            </execution>
        </executions>
        <dependencies>
            <dependency>
                <groupId>org.springframework.restdocs</groupId>
                <artifactId>spring-restdocs-asciidoctor</artifactId>
                <version>${spring-restdocs.version}</version>
            </dependency>
        </dependencies>
    </plugin>
    <plugin>
        <groupId>org.springframework.boot</groupId>
        <artifactId>spring-boot-maven-plugin</artifactId>
    </plugin>
</plugins>
asciidocとspring−cloud-contractのプラグインが入れられているのが確認できます。
Pom等に設定を追加する
2つを連携されるためにいくつか設定を行なう必要があります。
PomにContractのテストをスキップする設定を追加する
前述の通り、REST DocとCloud Contractを連携される場合、Yamlなどの契約を書く必要がありません。つまり、Cloud Contractが自動生成するテスト実行する必要がないので、スキップする設定を追加してやる必要があります。
ドキュメントによると、ユーザープロパティにspring.cloud.contract.verifier.skipをtrueで設定してやることでテストをスキップできるようなので設定を記述します。
<properties>
    <java.version>15</java.version>
    <spring-cloud.version>Hoxton.SR8</spring-cloud.version>
    <spring.cloud.contract.verifier.skip>true</spring.cloud.contract.verifier.skip>
</properties>
Spring Cloud Contract Pluginを削除する(追記)
このブログを投稿した際に以下のようなアドバイスをSpring Cloud Contract のAutherであるMarcin Grzejszczakさんからいただきました。
Thank you for telling me this, Mr. Marcin Grzejszczak!!
Nice article! BTW if you're using Spring Cloud Contract with Rest Docs you don't need to add the maven contract plugin cause you will not generate the tests nor will you package the stubs automatically.
— Marcin Grzejszczak (@MGrzejszczak) November 2, 2020
Contract とREST Docsを連携させる場合はテストもスタブも自動生成するわけで無いので、このプラグインは必要ないとのことです。なので消してしまって大丈夫です。
Stubの作成のための設定を追加する
StubのJarを作成するためにassembly pluginを入れて設定を追加してやる必要があります。まず、以下のプラグインをPomに追加します。
<plugin>
    <groupId>org.apache.maven.plugins</groupId>
    <artifactId>maven-assembly-plugin</artifactId>
    <executions>
        <execution>
            <id>stub</id>
            <phase>prepare-package</phase>
            <goals>
                <goal>single</goal>
            </goals>
            <inherited>false</inherited>
            <configuration>
                <attach>true</attach>
                <descriptors>./src/assembly/stub.xml</descriptors>
            </configuration>
        </execution>
    </executions>
</plugin>
次にサンプルを参考にstub.xmlを作成し${project_root}/src/assembly/配下に配置します。
<assembly
        xmlns="http://maven.apache.org/plugins/maven-assembly-plugin/assembly/1.1.3"
        xmlns:xsi="http://www.w3.org/2001/XMLSchema-instance"
        xsi:schemaLocation="http://maven.apache.org/plugins/maven-assembly-plugin/assembly/1.1.3 https://maven.apache.org/xsd/assembly-1.1.3.xsd">
    <id>stubs</id>
    <formats>
        <format>jar</format>
    </formats>
    <includeBaseDirectory>false</includeBaseDirectory>
    <fileSets>
        <fileSet>
            <directory>src/main/java</directory>
            <outputDirectory>/</outputDirectory>
            <includes>
                <include>**dev/hirooka/model/*.*</include>
            </includes>
        </fileSet>
        <fileSet>
            <directory>${project.build.directory}/classes</directory>
            <outputDirectory>/</outputDirectory>
            <includes>
                <include>**dev/hirooka/model/*.*</include>
            </includes>
        </fileSet>
        <fileSet>
            <directory>${project.build.directory}/snippets/stubs</directory>
            <outputDirectory>META-INF/${project.groupId}/${project.artifactId}/${project.version}/mappings</outputDirectory>
            <includes>
                <include>**/*</include>
            </includes>
        </fileSet>
        <fileSet>
            <directory>./target/generated-snippets/contracts</directory>
            <outputDirectory>META-INF/${project.groupId}/${project.artifactId}/${project.version}/contracts</outputDirectory>
            <includes>
                <include>**/*.groovy</include>
            </includes>
        </fileSet>
    </fileSets>
</assembly>
ここで、ポイントは<directory>./target/generated-snippets/contracts</directory>のところで、これは自動生成される契約のDSLを指定してやる必要があります。
デフォルトではtarget配下にcontractディレクトリが作成されそこにgroovyが出力されるのでそこを指定します。
<plugin>
    <groupId>org.springframework.cloud</groupId>
    <artifactId>spring-cloud-contract-maven-plugin</artifactId>
    <version>2.2.4.RELEASE</version>
    <extensions>true</extensions>
    <configuration>
        <testFramework>JUNIT5</testFramework>
        <packageWithBaseClasses>dev.hirooka</packageWithBaseClasses>
    </configuration>
</plugin>
spring-cloud-contract-wiremockの依存を追加する
Spring Cloud Contract Rest Docsのインテグレーションを使うためにはpomに以下の依存を追加する必要があります。
<dependency>
    <groupId>org.springframework.cloud</groupId>
    <artifactId>spring-cloud-contract-wiremock</artifactId>
    <scope>test</scope>
</dependency>
こいつを追加することで、Rest Docからスタブを生成することができるようになります。
ベースとなるテストと実装を書く
実装に入る前に先にテストを記述しておきます。
テストはJunit5とMockMVCを使って記述します。Spring REST Docsは他にも、WebTestClientやREST Assuredでも利用できます。
@SpringBootTest
class HelloControllerTest {

    private MockMvc mockMvc;

    @BeforeEach
    public void setUp(WebApplicationContext context) {
        this.mockMvc = MockMvcBuilders.webAppContextSetup(context).build();
    }

    @Test
    void HelloControllerのテスト() throws Exception {
        mockMvc.perform(get("/"))
                .andExpect(status().isOk())
                .andExpect(content().contentType(MediaType.APPLICATION_JSON))
                .andExpect(jsonPath("$.hello").value("world"));
    }
}
ここまでは一般的なテストですね次に実装を書きます。
@RestController
public class HelloController {
    @GetMapping("/")
    public Map<String, String> hello() {
        return Map.of("hello", "world");
    }
}
実装もごくごく一般的なコントローラーです。
テストを実行すると成功します。
[INFO] Tests run: 1, Failures: 0, Errors: 0, Skipped: 0, Time elapsed: 0.282 s - in hirooka.dev.cdcanddocs.controller.HelloControllerTest
REST Docsを追加する
ベースとなる実装ができたところでテストにREST Docsの設定を入れていきます。
先程の@BeforeEachで書いたMockMvcの設定とテスト自体を少しいじります。
@SpringBootTest
@ExtendWith(RestDocumentationExtension.class)
class HelloControllerTest {

    private MockMvc mockMvc;

    @BeforeEach
    public void setUp(
            WebApplicationContext context,
            RestDocumentationContextProvider provider
    ) {
        this.mockMvc = MockMvcBuilders.webAppContextSetup(context)
                .apply(documentationConfiguration(provider))
                .build();
    }

    @Test
    void HelloControllerのテスト() throws Exception {
        mockMvc.perform(get("/"))
                .andExpect(status().isOk())
                .andExpect(content().contentType(MediaType.APPLICATION_JSON))
                .andExpect(jsonPath("$.hello").value("world"))
                .andDo(document("index"));
    }
}
僕自身がRestDocsを使うのははじめてなので少しだけ突っ込んでまとめようと思います。
まず、最初に@ExtendWith(RestDocumentationExtension.class)を追加しています。このエクステンションを入れることで、@BforeEachの引数でRestDocumentationContextProviderを受け取ることができます。このクラスはRestDocumentationContextへのアクセスを提供します。
次に@BeforeEachにでMockMvcに設定を追加しています。 MockMvcRestDocumentationのdocumentationConfiguration()スタティックメソッドを使ってMockMvcにMockMvc用のRest Docs拡張である MockMvcRestDocumentationConfigurerを登録しています。ここまでで、事前準備は完了です。
次にTestクラスに着目すると、最後のandDo()で MockMvcRestDocumentationのdocumennt()スタティックメソッドを呼び出しています。このスタティックメソッドは第一引数にドキュメントの識別子と第二引数に可変引数としてSnippetインターフェースの実装を受け取ります。この実装は出力ドキュメントに対して付加情報を追加する際に利用します。
mvn testを実行するとtarget/generated-snippets/index/*.adocにデフォルトでは以下の画像の6種類のasciidocが出力されます。

結果の出力はMarkDownなどでも行えるようですが、ここでは深く触れないよ言うにします。
Contractと連携する。
AsciiDocの出力まで終わったところで、Spring Cloud Contractとの連携を行ってみようと思います。
テストコードを以下のように修正します。
@Test
void HelloControllerのテスト() throws Exception {
    mockMvc.perform(get("/"))
            .andExpect(status().isOk())
            .andExpect(content().contentType(MediaType.APPLICATION_JSON))
            .andExpect(jsonPath("$.hello").value("world"))
            .andDo(document("index", SpringCloudContractRestDocs.dslContract()));
}
document()の引数にSpringCloudContractRestDocs.dslContract()を渡すことで契約のDSLとスタブが自動生成されるようになります。
mvn clean installを実行するとtarget配下が以下のように生成されることがわかります。

Consumer側からのStubの利用
いくつか方法がありますが@AutoConfigureStubRunnerを使った方法をこちらにまとめてますのでそちらを参照してください。
リクエストをバリデートするような実装に変えてみる
今までは、リクエストに対して固定値を返すだけのシンプルな実装でしたが、リクエストのパターンによって返すものを変えるような実装に変えてみます。 例えば以下のようなストーリーを想定します。
Rest DocsとCloud Contractの連携でリクエストのヴァリファイを行なうスタブを作成する場合、WireMockRestDocsを利用します。
    @Test
    void HelloControllerのOKテスト() throws Exception {
        mockMvc.perform(post("/")
                .contentType(MediaType.APPLICATION_JSON)
                .content("{\"value\": 10}"))
                .andExpect(status().isOk())
                .andExpect(content().contentType(MediaType.APPLICATION_JSON))
                .andExpect(jsonPath("$.status").value("OK"))
                .andDo(
                        WireMockRestDocs.verify()
                                .contentType(MediaType.APPLICATION_JSON)
                                .jsonPath("$[?(@.value >= 10)]"))
                .andDo(document("okPattern", SpringCloudContractRestDocs.dslContract()));
    }


    @Test
    void HelloControllerのNGテスト() throws Exception {
        mockMvc.perform(post("/")
                .contentType(MediaType.APPLICATION_JSON)
                .content("{\"value\": 9}"))
                .andExpect(status().isOk())
                .andExpect(content().contentType(MediaType.APPLICATION_JSON))
                .andExpect(jsonPath("$.status").value("NG"))
                .andDo(
                        WireMockRestDocs.verify()
                                .contentType(MediaType.APPLICATION_JSON)
                                .jsonPath("$[?(@.value < 10)]"))
                .andDo(document("ngPattern", SpringCloudContractRestDocs.dslContract()));
    }
同じくmvn clean installをすればstubが生成されます。
参考資料
Docker Engine APIを使ってcURLでDokcer Engineを操作する
はじめに
Docker のクライアントは公式だとGoとかPythonのものはあるようですが、UNIXドメインソケットを使ったHTTPでの操作も可能なようです。このブログではcURLを用いてDocker Engineに対するコマンドを実行してみたいと思います。
Docker Engine API
Dokcer Engine APIはDocker Engineが提供するHTTP APIです。Docker ClinentなどはこのAPIを使ってEngineとコミュニケーションをとっています。大体のコマンドははこのAPIに対応付けられているようで、HTTPを使ってDokcer Engineの操作を行なうことができます。現在の最新のバージョンはv1.40みたいです。また、Docker Engine APIのOpenAPI Specificationはここから取得できます。
前述通り、実際にこのAPIへアクセスする場合はUNIXドメインソケットを使うようです例えばcURLで起動中のコンテナ一覧を取得場合は以下のようにします。
(公式のサンプルはここからみれます)
$ docker ps
CONTAINER ID        IMAGE               COMMAND             CREATED             STATUS              PORTS               NAMES


$ curl --unix-socket /var/run/docker.sock http:/v1.40/containers/json
[]
現状、動作中のコンテナは一つも無いで空のリストが返ってきています。
使ってみる
環境
$ uname -srvmpio
Linux 5.4.0-52-generic #57-Ubuntu SMP Thu Oct 15 10:57:00 UTC 2020 x86_64 x86_64 x86_64 GNU/Linux


$ lsb_release -a
LSB Version:    core-11.1.0ubuntu2-noarch:security-11.1.0ubuntu2-noarch
Distributor ID: Ubuntu
Description:    Ubuntu 20.04.1 LTS
Release:    20.04
Codename:   focal


$ docker version
Client: Docker Engine - Community
 Version:           19.03.12
 API version:       1.40
 Go version:        go1.13.10
 Git commit:        48a66213fe
 Built:             Mon Jun 22 15:45:36 2020
 OS/Arch:           linux/amd64
 Experimental:      false

Server: Docker Engine - Community
 Engine:
  Version:          19.03.12
  API version:      1.40 (minimum version 1.12)
  Go version:       go1.13.10
  Git commit:       48a66213fe
  Built:            Mon Jun 22 15:44:07 2020
  OS/Arch:          linux/amd64
  Experimental:     false
 containerd:
  Version:          1.2.13
  GitCommit:        7ad184331fa3e55e52b890ea95e65ba581ae3429
 runc:
  Version:          1.0.0-rc10
  GitCommit:        dc9208a3303feef5b3839f4323d9beb36df0a9dd
 docker-init:
  Version:          0.18.0

$ curl --version
curl 7.68.0 (x86_64-pc-linux-gnu) libcurl/7.68.0 OpenSSL/1.1.1f zlib/1.2.11 brotli/1.0.7 libidn2/2.2.0 libpsl/0.21.0 (+libidn2/2.2.0) libssh/0.9.3/openssl/zlib nghttp2/1.40.0 librtmp/2.3
Release-Date: 2020-01-08
Protocols: dict file ftp ftps gopher http https imap imaps ldap ldaps pop3 pop3s rtmp rtsp scp sftp smb smbs smtp smtps telnet tftp
Features: AsynchDNS brotli GSS-API HTTP2 HTTPS-proxy IDN IPv6 Kerberos Largefile libz NTLM NTLM_WB PSL SPNEGO SSL TLS-SRP UnixSockets
コンテナの作成
alpineのイメージつかってコンテナを作成します。
$ curl --unix-socket /var/run/docker.sock -H "Content-Type: application/json" \
>   -d '{"Image": "alpine", "Cmd": ["echo", "hello world"]}' \
>   -X POST http:/v1.40/containers/create
{"Id":"339e9914b446b768e0e1da6b313165f9a8187793175f068884e6c1597d6a8ea3","Warnings":[]}
コンテナ作成は/containers/createに対してPOSTで、必要な情報をJson形式で送ってやることで実行することができます。
コンテナの実行
次に先程作成したコンテナを実行します。
$ curl --unix-socket /var/run/docker.sock -X POST http:/v1.40//containers/339e9914b446/start
dokcer runに相当するような操作です。 POSTのリクエストを/containers/${IMAGE_ID}/startに送ってやることで実行可能です。
インスペクト
コンテナのインスペクトの実行をしてみます。
/containers/${IMAGE_ID}/jsonにGETリクエストを送ってやることで実行可能です。
$ curl  --unix-socket /var/run/docker.sock  "http:/v1.40/containers/339e9914b446/json"  | jq
  % Total    % Received % Xferd  Average Speed   Time    Time     Time  Current
                                 Dload  Upload   Total   Spent    Left  Speed
100  4369    0  4369    0     0  4266k      0 --:--:-- --:--:-- --:--:-- 4266k
{
  "Id": "339e9914b446b768e0e1da6b313165f9a8187793175f068884e6c1597d6a8ea3",
  "Created": "2020-10-24T12:37:07.655320189Z",
  "Path": "echo",
  "Args": [
    "hello world"
  ],
  "State": {
    "Status": "exited",
    "Running": false,
    "Paused": false,
    "Restarting": false,
    "OOMKilled": false,
    "Dead": false,
    "Pid": 0,
    "ExitCode": 0,
    "Error": "",
    "StartedAt": "2020-10-24T12:39:50.497526437Z",
    "FinishedAt": "2020-10-24T12:39:50.520324354Z"
  },
  "Image": "sha256:f70734b6a266dcb5f44c383274821207885b549b75c8e119404917a61335981a",
  "ResolvConfPath": "/var/lib/docker/containers/339e9914b446b768e0e1da6b313165f9a8187793175f068884e6c1597d6a8ea3/resolv.conf",
  "HostnamePath": "/var/lib/docker/containers/339e9914b446b768e0e1da6b313165f9a8187793175f068884e6c1597d6a8ea3/hostname",
  "HostsPath": "/var/lib/docker/containers/339e9914b446b768e0e1da6b313165f9a8187793175f068884e6c1597d6a8ea3/hosts",
  "LogPath": "/var/lib/docker/containers/339e9914b446b768e0e1da6b313165f9a8187793175f068884e6c1597d6a8ea3/339e9914b446b768e0e1da6b313165f9a8187793175f068884e6c1597d6a8ea3-json.log",
  "Name": "/agitated_swirles",
  "RestartCount": 0,
  "Driver": "overlay2",
  "Platform": "linux",
  "MountLabel": "",
  "ProcessLabel": "",
  "AppArmorProfile": "docker-default",
  "ExecIDs": null,
  "HostConfig": {
    "Binds": null,
    "ContainerIDFile": "",
    "LogConfig": {
      "Type": "json-file",
      "Config": {}
    },
    "NetworkMode": "default",
    "PortBindings": null,
    "RestartPolicy": {
      "Name": "",
      "MaximumRetryCount": 0
    },
    "AutoRemove": false,
    "VolumeDriver": "",
    "VolumesFrom": null,
    "CapAdd": null,
    "CapDrop": null,
    "Capabilities": null,
    "Dns": null,
    "DnsOptions": null,
    "DnsSearch": null,
    "ExtraHosts": null,
    "GroupAdd": null,
    "IpcMode": "private",
    "Cgroup": "",
    "Links": null,
    "OomScoreAdj": 0,
    "PidMode": "",
    "Privileged": false,
    "PublishAllPorts": false,
    "ReadonlyRootfs": false,
    "SecurityOpt": null,
    "UTSMode": "",
    "UsernsMode": "",
    "ShmSize": 67108864,
    "Runtime": "runc",
    "ConsoleSize": [
      0,
      0
    ],
    "Isolation": "",
    "CpuShares": 0,
    "Memory": 0,
    "NanoCpus": 0,
    "CgroupParent": "",
    "BlkioWeight": 0,
    "BlkioWeightDevice": null,
    "BlkioDeviceReadBps": null,
    "BlkioDeviceWriteBps": null,
    "BlkioDeviceReadIOps": null,
    "BlkioDeviceWriteIOps": null,
    "CpuPeriod": 0,
    "CpuQuota": 0,
    "CpuRealtimePeriod": 0,
    "CpuRealtimeRuntime": 0,
    "CpusetCpus": "",
    "CpusetMems": "",
    "Devices": null,
    "DeviceCgroupRules": null,
    "DeviceRequests": null,
    "KernelMemory": 0,
    "KernelMemoryTCP": 0,
    "MemoryReservation": 0,
    "MemorySwap": 0,
    "MemorySwappiness": null,
    "OomKillDisable": false,
    "PidsLimit": null,
    "Ulimits": null,
    "CpuCount": 0,
    "CpuPercent": 0,
    "IOMaximumIOps": 0,
    "IOMaximumBandwidth": 0,
    "MaskedPaths": [
      "/proc/asound",
      "/proc/acpi",
      "/proc/kcore",
      "/proc/keys",
      "/proc/latency_stats",
      "/proc/timer_list",
      "/proc/timer_stats",
      "/proc/sched_debug",
      "/proc/scsi",
      "/sys/firmware"
    ],
    "ReadonlyPaths": [
      "/proc/bus",
      "/proc/fs",
      "/proc/irq",
      "/proc/sys",
      "/proc/sysrq-trigger"
    ]
  },
  "GraphDriver": {
    "Data": {
      "LowerDir": "/var/lib/docker/overlay2/136d71a0857b85896e2c74cd22c82efbccf2739862fe56c0e00427afaef50ad2-init/diff:/var/lib/docker/overlay2/98748a873a839203b278e9bf5bd0086685aaa2e9b0fae44d74393e7cdfcb1691/diff",
      "MergedDir": "/var/lib/docker/overlay2/136d71a0857b85896e2c74cd22c82efbccf2739862fe56c0e00427afaef50ad2/merged",
      "UpperDir": "/var/lib/docker/overlay2/136d71a0857b85896e2c74cd22c82efbccf2739862fe56c0e00427afaef50ad2/diff",
      "WorkDir": "/var/lib/docker/overlay2/136d71a0857b85896e2c74cd22c82efbccf2739862fe56c0e00427afaef50ad2/work"
    },
    "Name": "overlay2"
  },
  "Mounts": [],
  "Config": {
    "Hostname": "339e9914b446",
    "Domainname": "",
    "User": "",
    "AttachStdin": false,
    "AttachStdout": false,
    "AttachStderr": false,
    "Tty": false,
    "OpenStdin": false,
    "StdinOnce": false,
    "Env": [
      "PATH=/usr/local/sbin:/usr/local/bin:/usr/sbin:/usr/bin:/sbin:/bin"
    ],
    "Cmd": [
      "echo",
      "hello world"
    ],
    "Image": "alpine",
    "Volumes": null,
    "WorkingDir": "",
    "Entrypoint": null,
    "OnBuild": null,
    "Labels": {}
  },
  "NetworkSettings": {
    "Bridge": "",
    "SandboxID": "055a82d24ed80b14fb2ff1e2d588192464199d3f51dab021efa2fcf0dc6a5df9",
    "HairpinMode": false,
    "LinkLocalIPv6Address": "",
    "LinkLocalIPv6PrefixLen": 0,
    "Ports": {},
    "SandboxKey": "/var/run/docker/netns/055a82d24ed8",
    "SecondaryIPAddresses": null,
    "SecondaryIPv6Addresses": null,
    "EndpointID": "",
    "Gateway": "",
    "GlobalIPv6Address": "",
    "GlobalIPv6PrefixLen": 0,
    "IPAddress": "",
    "IPPrefixLen": 0,
    "IPv6Gateway": "",
    "MacAddress": "",
    "Networks": {
      "bridge": {
        "IPAMConfig": null,
        "Links": null,
        "Aliases": null,
        "NetworkID": "7713a5ebd4018030b9f7c851707246986f794acfba01f7da0f3794769e712945",
        "EndpointID": "",
        "Gateway": "",
        "IPAddress": "",
        "IPPrefixLen": 0,
        "IPv6Gateway": "",
        "GlobalIPv6Address": "",
        "GlobalIPv6PrefixLen": 0,
        "MacAddress": "",
        "DriverOpts": null
      }
    }
  }
}
ログの取得
curl  --unix-socket /var/run/docker.sock  "http:/v1.40/containers/339e9914b446/logs?stdout=1" --output -

hello world
コンテナのログを取得する場合は、 POSTのリクエストを/containers/${IMAGE_ID}/logsに送ってやることで実行可能です。
最後に
このブログでは基本的にコンテナの操作だけを行いましたが基本なんの操作でもできそうです。
RouterFunctionでリクエストをインターセプトする
はじめに
Router Functionを利用しているときのサーブレットフィルターとかインターセプターみたいなのってどうやってやるんだろって言うのが気になったのでちょっと調べてみます。
やってみる
環境
環境は以下の通り
$ java --version
openjdk 15 2020-09-15
OpenJDK Runtime Environment (build 15+36-1562)
OpenJDK 64-Bit Server VM (build 15+36-1562, mixed mode, sharing)

$ mvn --version
Apache Maven 3.6.3
Maven home: /usr/share/maven
Java version: 15, vendor: Oracle Corporation, runtime: /home/someone/.sdkman/candidates/java/15-open
Default locale: ja_JP, platform encoding: UTF-8
OS name: "linux", version: "5.4.0-51-generic", arch: "amd64", family: "unix"
プロジェクトはSpring Initializrで作成して設定は以下のようにしました。

ざっくりやるとこ
大きくは以下の2つの手順を踏むっぽいです
- HandlerFilterFunctionを実装ししたFilter関数を作成する
- RouterFunctionにFilterとして登録する
下準備
まずはハンドラーを作成して、Router Functionクラスに登録します。
@Component
public class HelloResource {

    public Mono<ServerResponse> greeting(ServerRequest request){
        String name = request.queryParam("name").orElse("world");
        return ServerResponse.ok().body(Mono.just(String.format("Hello, %s", name)), String.class);
    }
}
@SpringBootApplication
public class RouterFunctionFilterApplication {

    private HelloResource helloResource;

    public RouterFunctionFilterApplication(HelloResource helloResource) {
        this.helloResource = helloResource;
    }

    public static void main(String[] args) {
        SpringApplication.run(RouterFunctionFilterApplication.class, args);
    }

    @Bean
    public RouterFunction router() {
        return RouterFunctions.route(GET("/hello"), helloResource::greeting);
    }

}
ハンドラーはクエリストリングで名前を受け取って挨拶を返すだけのものです。
cURLでリクエストを送ります。
$ curl localhost:8080/hello?name=henohenomoheji
Hello, henohenomoheji
ここまでで下準備は完了です。
HandlerFilterFunctionを実装ししたFilter関数を作成する
Router Functionでリクエストをインターセプトする場合フィルターを行なうためのクラス(もしくは関数)を作成する必要があります。このFilterはHandlerFilterFunctionインターフェースを実装することでフィルター関数を作成します。
このブログではリクエストを受け取ってその情報をログに出力するだけの簡単なフィルターを作成します。
単にフィルター関数をラムダとして書いてやることもできますが、わかりやすさのために一旦フィルタークラスを作成しようと思います。
HandlerFilterFunctionのfilter(ServerRequest request, HandlerFunction<T> next)のjavadocをみると以下のように書かれています。
/**
* Apply this filter to the given handler function. The given
* {@linkplain HandlerFunction handler function} represents the next entity in the chain,
* and can be {@linkplain HandlerFunction#handle(ServerRequest) invoked} in order to
* proceed to this entity, or not invoked to block the chain.
* @param request the request
* @param next the next handler or filter function in the chain
* @return the filtered response
* @see ServerRequestWrapper
*/
Mono<R> filter(ServerRequest request, HandlerFunction<T> next);
引数としてリクエストと次のフィルター(もしくはハンドラー)を表すHandlerFunction受け取るみたいですね。
HandlerFunctionインターフェースはhandle(ServerRequest request)メソッドを持っていてこいつにリクエストを渡すことで次のフィルターをチェインできるっぽいです。また、javadocによるとその戻り値はresponseになるようなので、レスポンスになにか共通処理を入れたい場合はその戻り値に対してゴニョゴニョできるみたいです。
今回の場合は戻り値に特に処理はくわえないので、たんにhandle(ServerRequest request)の実行をそのままレスポンスとして返してやれば良さそうです。
具体的には以下のようなクラスを作成します。
public class RequestLoggingFilter implements HandlerFilterFunction {

    private final Logger logger = LoggerFactory.getLogger(RequestLoggingFilter.class);

    @Override
    public Mono filter(ServerRequest request, HandlerFunction next) {
        logger.info(String.format("%s, %s", request, request.queryParams()));
        return next.handle(request);
    }
}
これでフィルターはできました。
RouterFunctionに作成したフィルターを登録する
作成したフィルターをRouterFunctionに登録します。
@SpringBootApplication
public class RouterFunctionFilterApplication {

    private final HelloResource helloResource;

    public RouterFunctionFilterApplication(HelloResource helloResource) {
        this.helloResource = helloResource;
    }

    public static void main(String[] args) {
        SpringApplication.run(RouterFunctionFilterApplication.class, args);
    }

    @Bean
    public RouterFunction router() {
        return RouterFunctions.route(GET("/hello"), helloResource::greeting)
                .filter(new RequestLoggingFilter());
    }

}
RouterFunctions.BuilderのfilterメソッドにHndlerFunctionの実装を渡してやると内部でRouterFunctions.FilteredRouterFunctionと呼ばれるWrapされたRouterFunctionを返してくれます。
リクエストを送ると以下のログが出力されました。
2020-10-17 11:48:37.360 INFO 20922 --- [or-http-epoll-2] d.h.r.RequestLoggingFilter : HTTP GET /hello, {name=[henohenomoheji]}
複数フィルターを登録する
別のフィルターをラムダで作って登録します。単に、fitelr()メソッドを再度呼び出して登録してやれば良さそうです。
@Bean
    public RouterFunction router() {
        return RouterFunctions.route(GET("/hello"), helloResource::greeting)
                .filter(new RequestLoggingFilter())
                .filter((r, n)->{
                    logger.info("filtered 1");
                    return n.handle(r);
                });

    }
リクエストを送ると、ログには以下のように出力されました。
2020-10-17 11:43:20.276  INFO 20430 --- [or-http-epoll-2] d.h.r.RouterFunctionFilterApplication    : filtered 1
2020-10-17 11:43:20.277  INFO 20430 --- [or-http-epoll-2] d.h.r.RequestLoggingFilter               : HTTP GET /hello, {name=[henohenomoheji]}
フィルターは後から登録されたものが先に実行されます。
まだ、ちゃんと調べてませんが、フィルターやハンドラーはRouterFunctionのコンポジットパターンとして扱われるようで、基本的には後から登録されたものが先に実行されるような構造になっているみたいです。
QuarkusでHealth Checkのエンドポイントを作成する
はじめに
KubernetesにはLiveness ProbeをReadiness Probeといった概念があり、アプリケーションにそれぞれを確認するためのエンドポイントを作成する場合があります。
Spring Boot(2.3以上)などではそのエンドポイントが用意されていますが、Quarkusにもそれぞれのエンドポイントを作るやりたか(正確にはMicroprofileの実装であるsmallryeのQuarkus拡張)があったので試してみようかと思います。
基本的に以下のドキュメントにしたがってやる形で試してみようと思います。
やってみる
環境
実行環境は以下の通り
$ java --version
openjdk 11.0.8 2020-07-14
OpenJDK Runtime Environment 18.9 (build 11.0.8+10)
OpenJDK 64-Bit Server VM 18.9 (build 11.0.8+10, mixed mode)

$ mvn --version
Apache Maven 3.6.3 (cecedd343002696d0abb50b32b541b8a6ba2883f)
Maven home: /snap/intellij-idea-ultimate/253/plugins/maven/lib/maven3
Java version: 11.0.8, vendor: N/A, runtime: /home/yuya-hirooka/.sdkman/candidates/java/11.0.8-open
Default locale: ja_JP, platform encoding: UTF-8
OS name: "linux", version: "5.4.0-48-generic", arch: "amd64", family: "unix"
プロジェクトはQuarkus - Start coding with code.quarkus.ioで作成します。
設定は以下の通り

デフォルトのエンドポイントを確認する
実は特になにもせずともデフォルトでRedinessとLivenessのエンドポイントは用意されています。
/health/live: アプリケーション本体が立ち上がっているかどうか/health/ready: DBの接続チェックなどを含めたアプリケーションがアクセスを受け入れる準備できているかどうか/health: RedinessとLiveness両方の情報を返す
アプリケーションを起動し以下のエンドポイントにアクセスしてみます。
$ curl -i http://localhost:8080/health
HTTP/1.1 200 OK
content-type: application/json; charset=UTF-8
content-length: 46


{
    "status": "UP",
    "checks": [
    ]
}

$ curl -i http://localhost:8080/health/ready
HTTP/1.1 200 OK
content-type: application/json; charset=UTF-8
content-length: 46


{
    "status": "UP",
    "checks": [
    ]
}


$ curl -i http://localhost:8080/health/live
HTTP/1.1 200 OK
content-type: application/json; charset=UTF-8
content-length: 46


{
    "status": "UP",
    "checks": [
    ]
}
ここで、UPがアプリケーションがアクティブな状態を示し、DOWNがアプリケーションがインアクティブであることを示します。
見ての通りこの状態だとアプリケーションはなにもチェックせず、自分自身が起動していることのみ確認することができます。
任意のチェックを行い結果を返す必要がある場合は、少し手をくわえてやる必要があります。
Health Cheackを作成する
例えば、Readinessのチェックではデータベースとの接続がうまく行っているか否かの確認を行いたい場合があります。そのような場合にはReadinessのHealth Checkを実装してやる必要があります。
まずは単にHealth Checkを実装します。
import org.eclipse.microprofile.health.HealthCheck;
import org.eclipse.microprofile.health.HealthCheckResponse;
import org.eclipse.microprofile.health.Readiness;

import javax.enterprise.context.ApplicationScoped;

@Readiness
@ApplicationScoped
public class ReadinessCheck implements HealthCheck {

    @Override
    public HealthCheckResponse call() {
        return HealthCheckResponse.up("test");
    }
}
Healthチェックを行なう際はorg.eclipse.microprofile.health.HealthCheckを実装したCDIのBeanとして作成します。この際、クラスに@Redinessをつけると/health/readyに対するHealth Cheackを実装でき、@Livenessをつけると/health/liveに対する実装を行えます。このブログでは@Redinessでの実装しか行いませんが、基本的には全く同じことが@Livenessでも行えるはずです。
UPの状態の結果を返す場合はHealthCheckResponse.up("任意の文字列")を利用します。
この状態で、cURLを叩くと以下のようなレスポンスを返します。
$ curl -i http://localhost:8080/health/ready
HTTP/1.1 200 OK
content-type: application/json; charset=UTF-8
content-length: 121


{
    "status": "UP",
    "checks": [
        {
            "name": "test",
            "status": "UP"
        }
    ]
}
実装をデータベースへの接続を確認するように修正します。
ここでは仮想的にDBの接続が失敗するような場合における実装をしてみます。
@Readiness
@ApplicationScoped
public class ReadinessCheck implements HealthCheck {

    @Override
    public HealthCheckResponse call() {
        try {
            checkDB();
            return HealthCheckResponse.up("test");
        } catch (Exception e) {
            e.printStackTrace();
            return HealthCheckResponse.down("db connection");
        }
    }

    private void checkDB(){
       throw new RuntimeException("db connection falied");
    }
}
ここでは、checkDB()というDBの接続を確認することを想定したメソッドを作成し、失敗を模擬的に表した、RuntimeExceptionを投げています。
もう一度、cURLを叩くと以下のようなレスポンスが返ってきます。
$ curl -i http://localhost:8080/health/ready
HTTP/1.1 503 Service Unavailable
content-type: application/json; charset=UTF-8
content-length: 134


{
    "status": "DOWN",
    "checks": [
        {
            "name": "db connection",
            "status": "DOWN"
        }
    ]
}
任意の情報を付加する
Health Checkに任意の情報を更かしたい場合はHealthCheckResponseBuilderを使います。
@Readiness
@ApplicationScoped
public class ReadinessCheck implements HealthCheck {

    @Override
    public HealthCheckResponse call() {
        try {
            checkDB();
            return HealthCheckResponse.named("db connection")
                    .up()
                    .build();
        } catch (Exception e) {
            e.printStackTrace();
            return HealthCheckResponse
                    .named("db connection")
                    .withData("foo", "bar")
                    .down().build();
        }
    }

    private void checkDB(){
       throw new RuntimeException("db connection falied");
    }
}
ここで、HealthCheckResponse.named("db connection")はHealthCheckResponseBuilderを返し、そのwithData("key", "value")メソッドを使って任意のデータを返します。
cURLを叩くと以下のようなレスポンスが返ってきます。
$ curl -i http://localhost:8080/health/ready
HTTP/1.1 503 Service Unavailable
content-type: application/json; charset=UTF-8
content-length: 200


{
    "status": "DOWN",
    "checks": [
        {
            "name": "db connection",
            "status": "DOWN",
            "data": {
                "foo": "bar"
            }
        }
    ]
}
複数の条件を確認するようなチェックを行なう
例えば、DB接続の他に依存APIも立ち上がっていることが必要な場合、複数の状態を確認してHealth Checkの結果としてUPを返す必要があります。
この場合、単にHealth Checkクラスを増やしてやるだけでOKです。
新たなHealth CheckクラスであるReadinessAPICheck.javaを作成します。
@Readiness
@ApplicationScoped
public class ReadinessAPICheck implements HealthCheck {

    @Override
    public HealthCheckResponse call() {
        try {
            chekAPI();
            return HealthCheckResponse.up("dependent api");
        } catch (Exception e) {
            e.printStackTrace();
            return HealthCheckResponse.down("dependent api");
        }
    }

    private void chekAPI(){
    }
}
cURLを叩くと以下のような結果が返ってきます。
$ curl -i http://localhost:8080/health/ready
HTTP/1.1 503 Service Unavailable
content-type: application/json; charset=UTF-8
content-length: 209


{
    "status": "DOWN",
    "checks": [
        {
            "name": "api",
            "status": "UP"
        },
        {
            "name": "db connection",
            "status": "DOWN"
        }
    ]
}
最終的なチェック結果は各チェックのAND条件で決まります。
この場合、DB接続のほうがDOWNとなっているので最終的な結果もDOWNとなります。
Health UI
QuarkusのHealth Checkでは簡易的なUIもデフォルトで用意してくれています。http://${APP_URL}//health-ui/にアクセスすることで、そのUIをみることができます。

ヘッダーの歯車ボタンを押すと設定を行なうことができます。

Pollの項目ではチェック結果更新のためのポーリングの時間を決められた間隔で設定することができます。
Configuration Property
application.proptertiesには以下のような設定ポイントが用意されています。
| プロパティ名 | 説明 | デフォルト値 |
|---|---|---|
| quarkus.health.extensions.enabled | Health Checkを有効にするか否かのフラグ | true (Boolean) |
| quarkus.smallrye-health.root-path | Health Checkのルートパス | /health (String) |
| quarkus.smallrye-health.liveness-path | Helth CheckのLivenessのパス | /live (String) |
| quarkus.smallrye-health.readiness-path | Helth CheckのReadinessのパス | /ready (String) |
| quarkus.smallrye-health.ui.root-path | Health UIへアクセするためのパス | /health-ui |
| quarkus.smallrye-health.ui.always-include | Health UIをビルド常にビルドに含めるかどうかの設定。デフォルトではtestモードとdevモードのときだけHealth UIをビルドに含める | false (Boolean) |
| quarkus.smallrye-health.ui.enable | Health UIを有効にするか否かのフラグ | ture (Boolean) |
参考
RouterFunctionでグローバルにエラーハンドリングして任意のレスポンスを返す
はじめに
@ControllerAdvanceや@ExceptionHandler,を使ったグローバルなエラーハンドリングはやったことがあったのですが、そういえばRouterFanctionでやったことなかったなと思い試してみたいと思います。
やってみる
ざっくりやること
大きく2つのやることがあります。
- ハンドルされる ResponseStatusExceptionを継承したExceptionクラスを作成する
- AbstractErrorWebExceptionHandlerを継承したハンドラークラスを作成し、BeanとしてDIコンテナに登録する
環境
実行環境は以下の通り
$ java --version
openjdk 15 2020-09-15
OpenJDK Runtime Environment (build 15+36-1562)
OpenJDK 64-Bit Server VM (build 15+36-1562, mixed mode, shari

$ mvn --version
Apache Maven 3.6.3
Maven home: /usr/share/maven
Java version: 15, vendor: Oracle Corporation, runtime: /home/somenone/.sdkman/candidates/java/15-open
Default locale: ja_JP, platform encoding: UTF-8
OS name: "linux", version: "5.4.0-48-generic", arch: "amd64", family: "unix"
プロジェクトはSpring Initializrで作成し、Bootのバージョンは2.3.4.RELEASEです。
ハンドラーを作成してRouterに登録する
まずはExpectionを発生させるハンドラーや諸々を実装します。
@Component
public class ExampleResource {

    public Mono<ServerResponse> throwUnexpectedException(ServerRequest serverRequest) {
        return throwRuntimeException()
                .flatMap(s -> ServerResponse.ok().contentType(MediaType.TEXT_PLAIN).body(s, String.class));
    }

    public Mono<String> throwRuntimeException() {
        return Mono.error(new RuntimeException("something happened"));
    }

}
Routerに登録します。
@SpringBootApplication
public class ErrorHandlingWithRouterFunctionApplication {

    public static void main(String[] args) {
        SpringApplication.run(ErrorHandlingWithRouterFunctionApplication.class, args);
    }

    @Bean
    public RouterFunction<ServerResponse> route(ExampleResource exampleResource) {
        return RouterFunctions
                .route(GET("/unexpected"), exampleResource::throwUnexpectedException);
    }
}
この状態で、/unexpectedに対してリクエストを送ると以下のようなレスポンスが来ます。
$ curl localhost:8080/unexpected
{"timestamp":"2020-10-08T10:39:04.101+00:00","path":"/unexpected","status":500,"error":"Internal Server Error","message":"","requestId":"e06546f4-1"}
これはデフォルトではSpringのDefaultErrorWebExceptionHandlerがいい感じにハンドリングしてくれて値を返してくれているからです。
ちなみにこのハンドラーはAcceptリクエストヘッダーによってはHTMLのホワイトページを返してくれたりもします。
javadocによると以下のディレクトリにステータスコードの名前のHTMLを配置することで任意のエラーページを返すことも可能なようです。
例えば404のステータスコードでは以下の順序で探索が行われるようです。
'/<templates>/error/404.<ext>'
'/<static>/error/404.html'
'/<templates>/error/4xx.<ext>'
'/<static>/error/4xx.html'
'/<templates>/error/error'
'/<static>/error/error.html'
ハンドルされる ResponseStatusExceptionを継承したExceptionクラスを作成する
ハンドラーは作成できたので次にスローする任意のExpeptionクラスを作成します。
このExpectionクラスはResponseStatusExceptionを継承します。これは、特定の HTTP レスポンスステータスコードに関連付けられた例外の基本クラスで、ステータスコード、理由、原因となったException等を持つことができます。
詳細は後述しますが、グローバルでハンドリングする際のエラーの情報を持つErrorAttributesはResponseStatusExceptionで保持する情報をもとに作成されます。
それではInternalServerErrorを表すInternalServerErrorException.javaを作成してみます。
InternalServerErrorExcepiton.java
public class InternalServerErrorException extends ResponseStatusException {
    public InternalServerErrorException(String message) {
        super(HttpStatus.INTERNAL_SERVER_ERROR, message);
    }
}
ここでは、HttpStatus.INTERNAL_SERVER_ERRORは固定値にしておき、messageはExceptionが発生する際に詰め込むようにします。
今回はこのメッセージをクライアント側に返すようにします。
作成したExceptionを投げるように先程のハンドラーの実装を書き換えます。
@Component
public class ExampleResource {

    public Mono<ServerResponse> throwUnexpectedException(ServerRequest serverRequest) {
        return throwRuntimeException()
                .flatMap(s -> ServerResponse.ok().contentType(MediaType.TEXT_PLAIN).body(s, String.class))
                .onErrorResume(RuntimeException.class, e -> Mono.error(new InternalServerErrorException("something happened")));
    }

    public Mono<String> throwRuntimeException() {
        return Mono.error(new RuntimeException("something happened"));
    }
}
throwRuntimeExpception()で投げられる例外を.onErrorResume()でキャッチして作成したInternalServerErrorExceptionに詰め替え再度スローしています。
ここまで書いておいてなんですが、こいつはわざわざ実装しなくてもResponseStatusExceptionを直接使うでも大丈夫だとは思います。
AbstractErrorWebExceptionHandlerを継承したハンドラークラスを作成し、BeanとしてDIコンテナに登録する
メインコンテンツのグローバルなエラーハンドラーを実装していきます。
ハンドラーを実装するためにはAbstractErrorWebExceptionHandler を継承したクラスを作成しgetRoutingFunction(ErrorAttributes errorAttributes)をオーバライドします。
GlobalErrorWebExceptionHandler.java
@Component
@Order(-2)
public class GlobalErrorWebExceptionHandler extends AbstractErrorWebExceptionHandler {

    protected final static Logger logger = LoggerFactory.getLogger(GlobalErrorWebExceptionHandler.class);
    public GlobalErrorWebExceptionHandler(DefaultErrorAttributes g, ApplicationContext applicationContext,
                                          ServerCodecConfigurer serverCodecConfigurer) {
        super(g, new ResourceProperties(), applicationContext);
        super.setMessageWriters(serverCodecConfigurer.getWriters());
        super.setMessageReaders(serverCodecConfigurer.getReaders());
    }


    @Override
    protected RouterFunction<ServerResponse> getRoutingFunction(ErrorAttributes errorAttributes) {
        return RouterFunctions.route(RequestPredicates.all(), r -> {
            ErrorAttributeOptions eao = ErrorAttributeOptions.defaults();

            Map<String, Object> ea = getErrorAttributes(r,
                    eao.including(ErrorAttributeOptions.Include.EXCEPTION, ErrorAttributeOptions.Include.MESSAGE)
            );
            logger.warn(ea);
            return renderJsonResponse(ea);
        });
    }

    private int getStatusCode(Map<String, Object> ea) {
        return (int) ea.get("status");
    }

    private Mono<ServerResponse> renderJsonResponse(Map<String, Object> ea) {
        ea.remove("exception");
        return ServerResponse.status(getStatusCode(ea))
                .contentType(MediaType.APPLICATION_JSON)
                .body(BodyInserters.fromValue(ea));
    }
}
GlobalErrorWebExceptionHandlerではDefualtErrorAttributesに格納されたExceptionの情報をもとにログを出力することと、Mono<ServerResponse>を作成することを行っています。
DefualtErrorAttributesでは以下のような情報を持つことができます。
- timestamp - エラーが抽出された時間
- status - HTTPのステータスコード
- error - エラーの理由
- exception - ルート例外のクラス名 (設定されている場合)
- message - 例外メッセージ (設定されている場合)
- errors BindingResult 例外からの ObjectError (設定されている場合)
- trace - 例外スタックトレース (設定されている場合)
- path - 例外が発生したときの URL パス
- requestId - リクエストのID
このなかで、 (設定されている場合)と書かれる4つの項目に関しては、ErrorAttributeOptions.Includeをオプションとして設定してgetErrorAttributesに渡してやることで取得することができます。
また、このDefualtErrorAttributesはErrorAttributesを実装したクラスをDIコンテナに登録し、エラーハンドラーでコンストラクターインジェクションを行ってセットすることでカスタマイズすることもできます。
getErrorAttributesはMap<String, Object>の形で保持する情報を返します。
この際のキーは上記のリストの英語部分のとおりです。
クラスに付与している@Order(-2)はautoconfigクラスであるErrorWebFluxAutoConfigurationで@Order(-1)で設定されているためより優先度を高くする必要があるためです。
最後に、renderJsonResponseではDefualtErrorAttributeの情報をもとにMono<ServerResponse>を作成しています。この際に内部の例外の情報を返すことは好ましくないためexceptionはマップから削除しています。
アプリケーションを再起動してcurlでアクセスしてみます。
$ curl localhost:8080/unexpected
{"timestamp":"2020-10-08T12:18:07.761+00:00","path":"/unexpected","status":500,"error":"Internal Server Error","message":"something happened","requestId":"fe9c31ea-2"}y
Spring WebFluxでブロッキング処理を書く
はじめに
てっきり、WebFluxのようなReactiveの場合、ハンドラーみたいなのはEventLoopとは別スレッドで動いているもんだとばかり思っていたのですが、どうやらそうではないようで(冷静に考えれば当たり前、と言うかそうしてしまったら意味がない)、悪気なくリソースクラスとかでブロッキングするような処理を書いてしまいリクエストをつまらせるというやらかしをしてしまいました。
そもそも、この辺の理解がかなり曖昧だったのでちょっと調べてみようと思います。あと、一応ブロッキングの処理を書くこともできるようなのでそのやり方についてもまとめます。
ハンドラーでブロッキングした際のThreadの動きを確認する
環境
動作する環境は以下のような感じ
$ java --version
openjdk 11.0.8 2020-07-14
OpenJDK Runtime Environment 18.9 (build 11.0.8+10)
OpenJDK 64-Bit Server VM 18.9 (build 11.0.8+10, mixed mode)


$ lsb_release -a
LSB Version:    core-11.1.0ubuntu2-noarch:security-11.1.0ubuntu2-noarch
Distributor ID: Ubuntu
Description:    Ubuntu 20.04.1 LTS
Release:    20.04
Codename:   focal

$ uname -srvmpio
Linux 5.4.0-48-generic #52-Ubuntu SMP Thu Sep 10 10:58:49 UTC 2020 x86_64 x86_64 x86_64 GNU/Linux
プロジェクトはSpring Initializrで作成して、
Spring Bootは 2.3.4.RELEASE、依存はSpring Reactive Webだけ追加しました。
また、詳細に使い方は説明しませんが、VisualVMを使ってThreadの動きを確認したいと思います。(VisualVMについては以前記事を書いたのでそちらを見ていただけると嬉しいです。)
ハンドラーを実装する
リソースクラスを作成し、ブロッキングを行なうハンドラーと行わないハンドラーを書きます。
@Component
public class HelloResource {

    private HelloService service;

    public HelloResource(HelloService service) {
        this.service = service;
    }

    public Mono<ServerResponse> blockingGreeting(ServerRequest request) {
        try {
            TimeUnit.MINUTES.sleep(30);
        } catch (InterruptedException e) {
            e.printStackTrace();
        }
        return ServerResponse.ok().body(Mono.just("hello"), String.class);
    }

    public Mono<ServerResponse> asyncGreeting(ServerRequest request) {
        return ServerResponse.ok().contentType(MediaType.APPLICATION_STREAM_JSON).body(
                Flux.interval(Duration.ofSeconds(5)).take(300), Long.class);
    }
}
そして、ハンドラーをRouterFunctionへ登録します。
@Bean
public RouterFunction<ServerResponse> route(HelloResource helloResource) {
    return RouterFunctions
            .route(GET("/block"), helloResource::blockingGreeting)
            .andRoute(GET("/async"), helloResource::asyncGreeting);
}
ここまでで、下準備はOK。
リクエストを送りスレッドを確認する
アプリを起動し、ブロッキングしている方のハンドラーにリクエスト送ってみます。
$ curl localhost:8080/block
すると以下のようにreactor-http-epoll-2というEventLoopのスレッドが作成されて、Sleep状態に入ってしまったことがわかります。
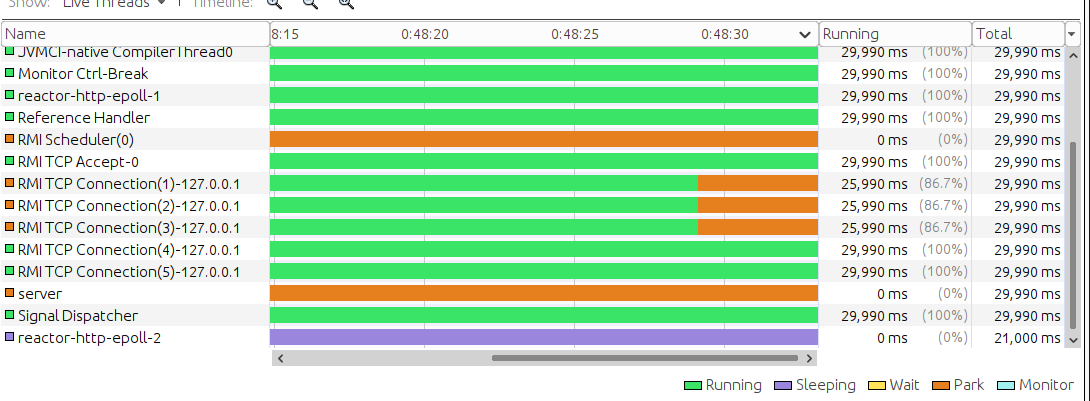
reactor-http-epoll-2のThread Dumpをみると確かにハンドラーがEventLoopのスレッドで実行されて、処理がブロッキングされているのがわかります。
"reactor-http-epoll-2" #35 daemon prio=5 os_prio=0 cpu=85.35ms elapsed=434.60s tid=0x00007f76f4005000 nid=0x131db waiting on condition  [0x00007f77081e6000]
   java.lang.Thread.State: TIMED_WAITING (sleeping)
        at java.lang.Thread.sleep(java.base@11.0.6/Native Method)
        at dev.hirooka.demo.flux.HelloResource.blockingGreeting(HelloResource.java:24)
        at dev.hirooka.demo.flux.Application$$Lambda$416/0x00000008402d5040.handle(Unknown Source)
        at org.springframework.web.reactive.function.server.support.HandlerFunctionAdapter.handle(HandlerFunctionAdapter.java:61)
        at org.springframework.web.reactive.DispatcherHandler.invokeHandler(DispatcherHandler.java:161)
        at org.springframework.web.reactive.DispatcherHandler.lambda$handle$1(DispatcherHandler.java:146)
        at org.springframework.web.reactive.DispatcherHandler$$Lambda$575/0x00000008403a9840.apply(Unknown Source)
        at reactor.core.publisher.MonoFlatMap$FlatMapMain.onNext(MonoFlatMap.java:118)
        at reactor.core.publisher.FluxSwitchIfEmpty$SwitchIfEmptySubscriber.onNext(FluxSwitchIfEmpty.java:67)
        at reactor.core.publisher.MonoNext$NextSubscriber.onNext(MonoNext.java:76)
        at reactor.core.publisher.FluxConcatMap$ConcatMapImmediate.innerNext(FluxConcatMap.java:274)
        at reactor.core.publisher.FluxConcatMap$ConcatMapInner.onNext(FluxConcatMap.java:851)
        at reactor.core.publisher.FluxMap$MapSubscriber.onNext(FluxMap.java:114)
        at reactor.core.publisher.FluxPeek$PeekSubscriber.onNext(FluxPeek.java:192)
        at reactor.core.publisher.MonoNext$NextSubscriber.onNext(MonoNext.java:76)
        at reactor.core.publisher.FluxConcatArray$ConcatArraySubscriber.onNext(FluxConcatArray.java:176)
        at reactor.core.publisher.Operators$ScalarSubscription.request(Operators.java:2344)
        at reactor.core.publisher.Operators$MultiSubscriptionSubscriber.set(Operators.java:2152)
        at reactor.core.publisher.Operators$MultiSubscriptionSubscriber.onSubscribe(Operators.java:2026)
        at reactor.core.publisher.MonoJust.subscribe(MonoJust.java:54)
        at reactor.core.publisher.Mono.subscribe(Mono.java:4213)
        at reactor.core.publisher.FluxConcatArray$ConcatArraySubscriber.onComplete(FluxConcatArray.java:207)
        at reactor.core.publisher.FluxConcatArray.subscribe(FluxConcatArray.java:80)
        at reactor.core.publisher.Mono.subscribe(Mono.java:4213)
        at reactor.core.publisher.FluxConcatMap$ConcatMapImmediate.drain(FluxConcatMap.java:441)
        at reactor.core.publisher.FluxConcatMap$ConcatMapImmediate.onSubscribe(FluxConcatMap.java:211)
        at reactor.core.publisher.FluxIterable.subscribe(FluxIterable.java:161)
        at reactor.core.publisher.FluxIterable.subscribe(FluxIterable.java:86)
        at reactor.core.publisher.InternalMonoOperator.subscribe(InternalMonoOperator.java:64)
        at reactor.core.publisher.MonoDefer.subscribe(MonoDefer.java:52)
        at reactor.core.publisher.Mono.subscribe(Mono.java:4213)
        at reactor.core.publisher.MonoIgnoreThen$ThenIgnoreMain.drain(MonoIgnoreThen.java:172)
        at reactor.core.publisher.MonoIgnoreThen.subscribe(MonoIgnoreThen.java:56)
        at reactor.core.publisher.InternalMonoOperator.subscribe(InternalMonoOperator.java:64)
        at reactor.netty.http.server.HttpServerHandle.onStateChange(HttpServerHandle.java:65)
        at reactor.netty.ReactorNetty$CompositeConnectionObserver.onStateChange(ReactorNetty.java:518)
        at reactor.netty.tcp.TcpServerBind$ChildObserver.onStateChange(TcpServerBind.java:272)
        at reactor.netty.http.server.HttpServerOperations.onInboundNext(HttpServerOperations.java:462)
        at reactor.netty.channel.ChannelOperationsHandler.channelRead(ChannelOperationsHandler.java:96)
        at io.netty.channel.AbstractChannelHandlerContext.invokeChannelRead(AbstractChannelHandlerContext.java:379)
        at io.netty.channel.AbstractChannelHandlerContext.invokeChannelRead(AbstractChannelHandlerContext.java:365)
        at io.netty.channel.AbstractChannelHandlerContext.fireChannelRead(AbstractChannelHandlerContext.java:357)
        at reactor.netty.http.server.HttpTrafficHandler.channelRead(HttpTrafficHandler.java:172)
        at io.netty.channel.AbstractChannelHandlerContext.invokeChannelRead(AbstractChannelHandlerContext.java:379)
        at io.netty.channel.AbstractChannelHandlerContext.invokeChannelRead(AbstractChannelHandlerContext.java:365)
        at io.netty.channel.AbstractChannelHandlerContext.fireChannelRead(AbstractChannelHandlerContext.java:357)
        at io.netty.channel.CombinedChannelDuplexHandler$DelegatingChannelHandlerContext.fireChannelRead(CombinedChannelDuplexHandler.java:436)
        at io.netty.handler.codec.ByteToMessageDecoder.fireChannelRead(ByteToMessageDecoder.java:324)
        at io.netty.handler.codec.ByteToMessageDecoder.channelRead(ByteToMessageDecoder.java:296)
        at io.netty.channel.CombinedChannelDuplexHandler.channelRead(CombinedChannelDuplexHandler.java:251)
        at io.netty.channel.AbstractChannelHandlerContext.invokeChannelRead(AbstractChannelHandlerContext.java:379)
        at io.netty.channel.AbstractChannelHandlerContext.invokeChannelRead(AbstractChannelHandlerContext.java:365)
        at io.netty.channel.AbstractChannelHandlerContext.fireChannelRead(AbstractChannelHandlerContext.java:357)
        at io.netty.channel.DefaultChannelPipeline$HeadContext.channelRead(DefaultChannelPipeline.java:1410)
        at io.netty.channel.AbstractChannelHandlerContext.invokeChannelRead(AbstractChannelHandlerContext.java:379)
        at io.netty.channel.AbstractChannelHandlerContext.invokeChannelRead(AbstractChannelHandlerContext.java:365)
        at io.netty.channel.DefaultChannelPipeline.fireChannelRead(DefaultChannelPipeline.java:919)
        at io.netty.channel.epoll.AbstractEpollStreamChannel$EpollStreamUnsafe.epollInReady(AbstractEpollStreamChannel.java:795)
        at io.netty.channel.epoll.EpollEventLoop.processReady(EpollEventLoop.java:475)
        at io.netty.channel.epoll.EpollEventLoop.run(EpollEventLoop.java:378)
        at io.netty.util.concurrent.SingleThreadEventExecutor$4.run(SingleThreadEventExecutor.java:989)
        at io.netty.util.internal.ThreadExecutorMap$2.run(ThreadExecutorMap.java:74)
        at io.netty.util.concurrent.FastThreadLocalRunnable.run(FastThreadLocalRunnable.java:30)
        at java.lang.Thread.run(java.base@11.0.6/Thread.java:834)
今度は非同期の方にリクエストを送ってみます。
$ curl localhost:8080/async
0
1
2
この場合では、reactor-http-epoll-2はSleepされずparallel-1と呼ばれるTreadが作成されます。
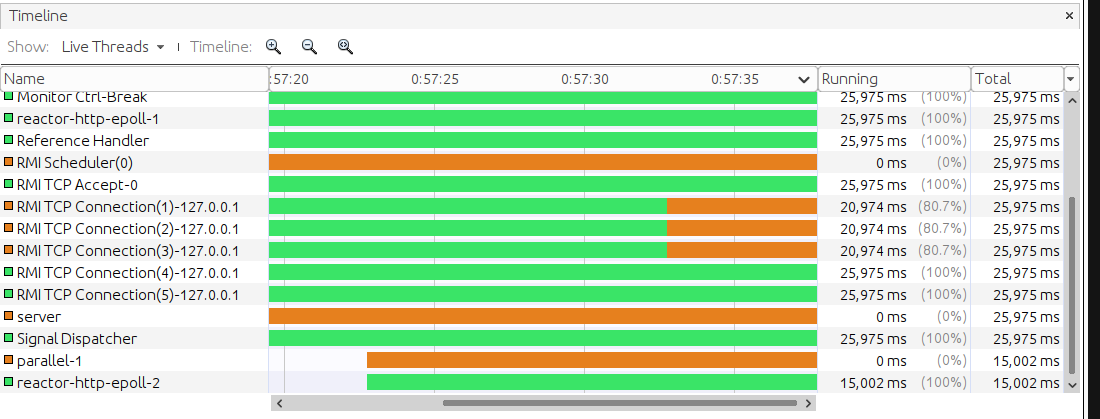
parallel-1はSchedulers.parallel()で作成されるスレッドで、Fluxのイベント発行時にはこのスレッドで処理が行われるようです。
ログからはJacsonの処理が行われているのを確認することができます。
2020-10-03 01:24:30.073 DEBUG 80149 --- [ parallel-1] o.s.http.codec.json.Jackson2JsonEncoder : [12112c2a-1] Encoding [149]
EventLoopのスレッドを食いつぶす
EventLoopのスレッド最大数のデフォルト値はLoopResourcesで設定されているようで、最小4で、利用可能なプロセッサーの数がデフォルトとして設定されるようです。
私の環境で論理プロセッサーの数は8個なのでデフォルトでは、最大8このスレッドをプールします。
$ grep processor /proc/cpuinfo | wc -l
8
このプール食いつぶした際には後のリクエストがハングしてしまいます。
8回のcurl localhost:8080/blockのリクエストを送信しEventLoopを食いつぶします。
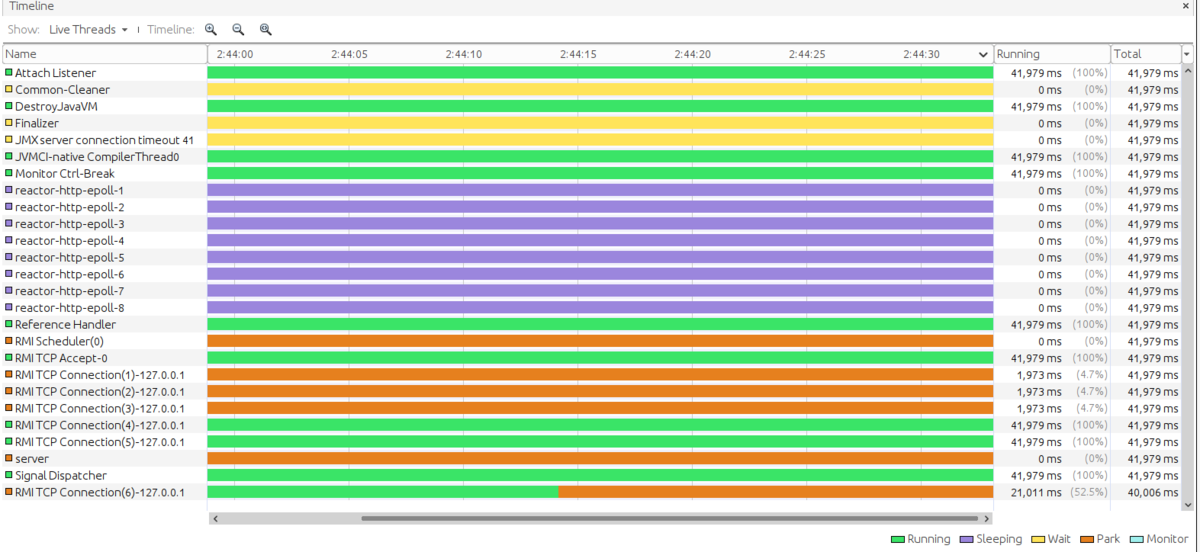
reactor-http-epoll-1~reactor-http-epoll-8までがすべてSleepしていることが確認できます。
この状況でasyncのリクエストを送信します。
$ curl localhost:8080/async
この場合、EventPoolのスレッドを食いつぶしてしまっているため、いつまで立っても値は返ってきません。
ブロッキングAPIを呼び出すためにどうするか?
どうしてもハンドラーやその呼び出し先でブロッキングなAPIを利用したい場合、
ドキュメントによるとpublishOnオペレータを使えということだったので、先程のハンドラーをちょっと書き直して見ます。
public Mono<ServerResponse> blockingGreeting(ServerRequest request) {
    return ServerResponse.ok().body(Mono.fromCallable(() -> {
                TimeUnit.MINUTES.sleep(30);
                return "hello";
             }).publishOn(Schedulers.elastic())
             , String.class);
}
Mono.fromCallable()の中でブロッキングな処理を書き、publishOnにスケジューラーを登録します。ちなみにelasticは必要に応じて、新しいWorkerを生成するSchedulerです。
リクエストを送り再度、Threadの状態を確認してみます。
$ curl localhost:8080/block
スレッドは以下のようになりました。
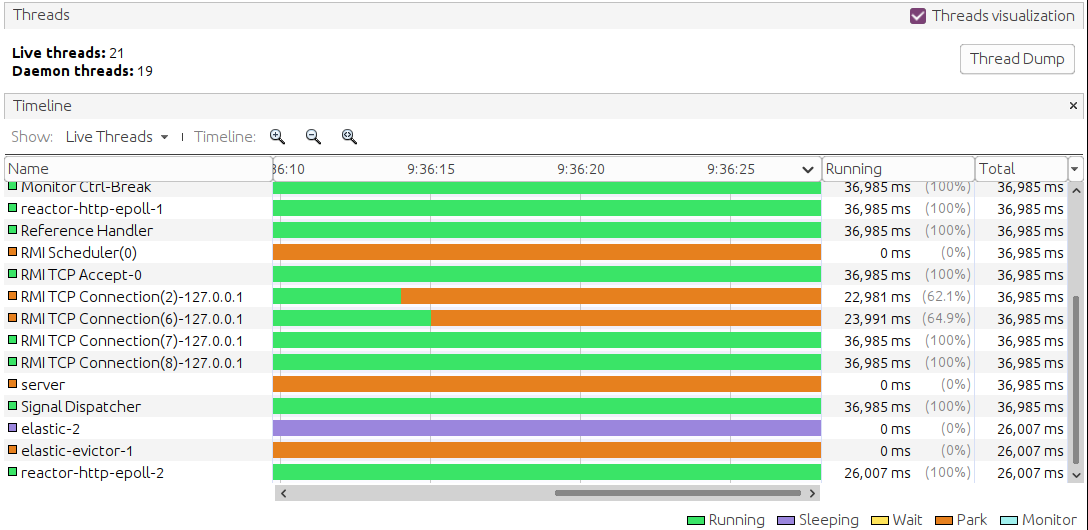
elastic-2というスレッドとelastic-evictor-1というスレッドが作成され、reactor-http-epoll-*はブロックされてないのが確認できます。
ログも以下のとおりになり、Writeが別スレッドで行われるようになっていました。
2020-10-03 09:24:39.380 DEBUG 7498 --- [ elastic-2] o.s.core.codec.CharSequenceEncoder : [cef65a9b-1] Writing "hello"
参考資料
Kotlinでのエラーハンドリング(ResultとEither)
はじめに
諸々の事情で、今後Kotlinを使うことになりようなので、少し学びたいなと思いました。
いろいろ本とか読んでる中で、Javaと大きな違い1つとして、エラーハンドリングのやり方があるように感じたので、このブログではそれについてまとめます。
大本は、みんなのKotlin 現場で役立つ最新ノウハウ!に書かれていたResultとEitherを深ぼって自分用にまとめ直したものなので、よりわかりやすくまとめられている本家をみるほうがよいと思います。
ResultとEither
KotlinのエラーハンドリングではResultとEitherという型をうまく扱って行なうようです。
Result
Resultは関数の実行の成功と失敗(Success T | Failure Throwable)を表すユニオン型で、Kotlin1.3以降で利用することが可能です。
早速使っていきます。
Resultを使ったエラーハンドリング
例えば以下のような必ず例外を起こすような関数があるとします。
private fun doSomethingButErrorHappen(): String = throw RuntimeException("execute failed")
この関数は以下のようにハンドリングすることができます。
fun main() {
    runCatching { doSomethingButErrorHappen() }
            .onFailure { println(it.message)}
            .onSuccess { println("execution success") }}
}
runCatchingブロックの中で実行された関数の戻り値はResult<T>で包まれて、onFailureとonSuccessでそれぞれ関数の成功と失敗(例外発生)をハンドリングすることができます。
main関数を実行すると標準出力に以下の出力がされます。
execution failed
もう少し複雑なパターンとして、とあるリストに対する逐次的な処理でのエラーハンドリングを行いたい場合は以下のようにします。
// 失敗する可能性がある関数
// 引数して3を受け取った場合に例外を投げる
private fun doSomethingsMightErrorHappen(number: Int): String {
    if (number == 3) {
        throw RuntimeException(number.toString())
    }
    return number.toString()
}

// runCatchingを外出しするためのヘルパー関数
private fun doSomethingsCatching(numbers: List<Int>): List<Result<String>> = numbers.map {
    runCatching {
        doSomethingsMightErrorHappen(it)
    }
}

// main
fun main() {
    doSomethingsCatching(listOf(1, 2, 3, 4, 5)).map { result ->
        result.onSuccess { println(it) }
                .onFailure { println(it) }
    }
}
ヘルパー関数のmapないでrunCatchingを呼び出すことによって、Resultのリストを作成し、そのりすとに対して、失敗と成功をハンドリングしています。
こいつの実行結果は以下のとおりになります。
1
2
java.lang.RuntimeException: 3
4
5
単にmap関数を実行すれば成功のケースのみに対して、追加処理を実行することができます。
fun main() {
    doSomethingsCatching(listOf(1, 2, 3, 4, 5)).map { result ->
        result.map { println(it) }
    }
}
実行結果
1
2
4
5
Either
Resultとは別にKotlinのArrowというライブラリを用いると、Eitherという型で自由な成功と失敗を表現することができます。 Eitherそのものは2つの値どちらかになるという中小概念を型として扱うためのものです。
Arrowを使う際はここを参考にプロジェクトに依存を追加してしてください。
Eitherで失敗と成功を表現する
Eitherは以下のように作成することができます。
//成功時のEither
val right = Either.right("success")

//失敗時のEither
val left = Either.left(RuntimeException())

//どちらともなりうる場合のEither
val errorOrVal = Either.cond(Random.nextBoolean(),
        ifTrue = { "success" },
        ifFalse = { RuntimeException() }
)
ドキュメントによると慣習的にrightが成功、leftが失敗を表すそうです。
ここで、失敗を表すleftにはRuntimeExpection()を詰め込んでますが、とくにThrowableじゃないとだめみたいな制約は無く、自由に失敗を表現することができます。
Eitherでエラーをハンドリングする
Eitherでエラーハンドリングを行なう場合パターンマッチで行なう方法とfoldを使う方法のに種類あります。
まずは単純に失敗を返す関数を作成します。
private fun doSomethingButErrorHappenWithEither(): Either<Exception, String> = Either.left(RuntimeException("execute failed"))
上記の関数をパターンマッチでハンドリングすると以下のようになります。
when (val either = doSomethingButErrorHappenWithEither()) {
    is Either.Left -> println(either.a.message)
    is Either.Right -> println("execution success")
}
関数はEither.Leftを返すのでエラーを出力する側にパターンマッチされます。 実行結果は以下の通り
execution failed
こんどはfold関数をつかって同じことをしてみます。
val either = doSomethingButErrorHappenWithEither()
either.fold({ println(it.message)},{ println(it)})
foldを使うことで、より記述が簡潔になりました。
実行結果も同じです。
executio
最後に、とあるリストに対する逐次的な処理でのエラーハンドリングを行ってみます。
private fun doSomethingsMightErrorHappenWithEither(number: Int): Either<Exception, String> {
    if (number == 3) {
        return Either.left(RuntimeException(number.toString()))
    }
    return Either.right(number.toString())
}
ハンドリング側はこんな感じ
listOf(1, 2, 3, 4, 5)
        .map {
            doSomethingsMightErrorHappenWithEither(it)
                    .fold(
                            { f -> println(f.message) },
                            { s -> println(s) }
                    )
        }
実行すると以下のような出力がされました。
1
2
java.lang.RuntimeException: 3
4
5